Securing Asp.Net Core Web API with Identity Server (Part 2)


This is part 2 of a 5 part series:

In the previous post, we looked at how to setup Identity Server with a bare bone ASP.Net core application.

In production, more often than not, you would have your configurations (clients, scopes, resources etc.) in a database rather than defined in code. It makes sense, and gives more flexibility and scalability when integrating authentication and authorization flows.

In this part, we will look at moving our Identity Server configurations into a more persistent store. We will be using SQL Server, but the data store can be of your choosing. So let’s get started.

Install the following nuget packages into IdentityServer.csproj project:

Next, we need to define a connection string in appsettings.json file that points to the SQL server instance on your machine.

  "ConnectionStrings": {
    "IdentityDbConnectionName": "Server=localhost\\SQLEXPRESS;Database=IdentityDb;Trusted_Connection=True;"
  },
  "WeatherApiClient": "http://localhost:5001" 

Next, we modify the Startup.cs from the earlier post to configure Identity Server’s Configuration and Operational store to point to the database as defined in the connection string.

private static DbContextOptionsBuilder AddDbContext(DbContextOptionsBuilder builder,
    IConfiguration configuration) =>
    builder.UseSqlServer(configuration.GetConnectionString("IdentityDbConnectionName"),
        sqlOptions =>
        {
            sqlOptions.MigrationsAssembly(typeof(Startup).Assembly.FullName);
            sqlOptions.EnableRetryOnFailure(5, TimeSpan.FromSeconds(10), null);
        });

public void ConfigureServices(IServiceCollection services)
{
    services.AddIdentityServer()
            .AddDeveloperSigningCredential()
            .AddConfigurationStore(options =>
            {
                options.ConfigureDbContext = builder => AddDbContext(builder, Configuration);
            })
            .AddOperationalStore(options =>
            {
                options.ConfigureDbContext = builder => AddDbContext(builder, Configuration);
            });
            
    services.AddControllers();
    services.AddControllersWithViews();
    services.AddRazorPages();
}

Now that this is in place, let’s create a Data seeder class that will seed the initial Identity Server configuration data to the database. We will use the configuration data defined earlier in the Config.cs.

Pay attention to line 5. (I have added the URL for the Weather API (that we will create in part 4) to appsettings.json)

public class ConfigurationDataSeeder
{
    public async Task SeedAsync(ConfigurationDbContext context, IConfiguration configuration)
    {
        var clientUrl = configuration.GetValue<string>("WeatherApiClient");

        if (!context.Clients.Any())
        {
            foreach (var client in Config.Clients(clientUrl))
                await context.Clients.AddAsync(client.ToEntity());

            await context.SaveChangesAsync();
        }
        else
        {
            var oldRedirects = (await context.Clients.Include(c => c.RedirectUris)
                    .ToListAsync())
                    .SelectMany(c => c.RedirectUris)
                    .Where(ru => ru.RedirectUri.EndsWith("/o2c.html"))
                    .ToList();

            if (oldRedirects.Any())
            {
                foreach (var redirectUri in oldRedirects)
                {
                    redirectUri.RedirectUri = redirectUri.RedirectUri.Replace("/o2c.html", "/oauth2-redirect.html");
                    context.Update(redirectUri.Client);
                }
                await context.SaveChangesAsync();
            }
        }

        if (!context.IdentityResources.Any())
        {
            foreach (var resource in Config.Resources())
                await context.IdentityResources.AddAsync(resource.ToEntity());

            await context.SaveChangesAsync();
        }

        if (!context.ApiResources.Any())
        {
            foreach (var api in Config.Apis())
                await context.ApiResources.AddAsync(api.ToEntity());

            await context.SaveChangesAsync();
        }

        if (!context.ApiScopes.Any())
        {
            foreach (var scope in Config.Scopes())
                await context.ApiScopes.AddAsync(scope.ToEntity());

            await context.SaveChangesAsync();
        }
    }
}

The next order of business, is to make sure that the seeder is run at application startup. Running the seeder will do a few things:

  • Create the database if it doesn’t exist (this is only done once)
  • Create the tables required by the ConfigurationDbContext and PersistedGrantDbContext in the database

Program.cs

public static async Task Main(string[] args)
{
    var configuration = GetConfiguration();
    Log.Logger = CreateLogger(configuration);

    try
    {
        Log.Information("Starting configuring the host...");
        var host = CreateHostBuilder(args).Build();

        Log.Information("Starting applying database migrations...");
        using var scope = host.Services.CreateScope();

        var configurationContext = scope.ServiceProvider.GetRequiredService<ConfigurationDbContext>();
        await configurationContext.Database.EnsureCreatedAsync();
        await new ConfigurationDataSeeder().SeedAsync(configurationContext, configuration);
        await configurationContext.Database.MigrateAsync();

        var persistedGrantDbContext = scope.ServiceProvider.GetRequiredService<PersistedGrantDbContext>();
        await persistedGrantDbContext.Database.EnsureCreatedAsync();
        await persistedGrantDbContext.Database.MigrateAsync();

        Log.Information("Starting the host...");
        await host.RunAsync();
    }
    catch (Exception exception)
    {
        Log.Fatal(exception, "Program terminated unexpectedly");
        throw;
    }
    finally { Log.CloseAndFlush(); }
}

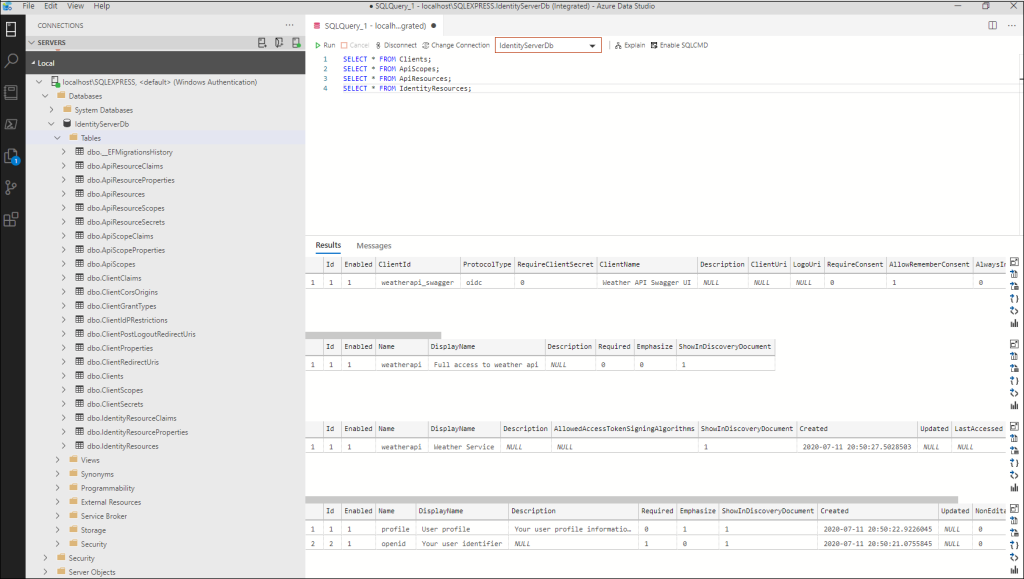
And that’s about it! When you run the application, it will create migrations at runtime and apply them to the database, creating all the required tables (including the database).

My Github repository is updated with the code and some more optimizations. Check it out here.

Part 3 coming soon!!

Securing Asp.Net Core Web API with Identity Server (Part 1)


In this series we are going to look at securing a Web API built with ASP.Net Core, using Identity Server. The technology stack we are going to work with is:

This is part 1 of a 5 part series:

Source Code

I will be posting the code for the series on my github repository, so keep an eye on that space.

Configuring Identity Server

Identity Server is by far the best framework that supports a number of OAuth 2.0 and OpenID connect specifications, which includes the PKCE (Proof Key for Code Exchange) specification as per RFC-7636 used with the Authorization Code flow. Before IETF came up with PKCE, Implicit flow was the most commonly used OAuth flow used for browser based applications.

In this series we will be looking at securing the WEB API using the Authorization Code + PKCE code flow. Let’s get cracking!

We will start by creating a bare bone ASP.Net Core application. (Note: Un-check the ‘Configure for HTTPS’ for the purpose of this demo) and install the following Nuget package:

There a few concepts that need to be understood before we can start configuring the Identity Server. Briefly:

  • Client: An application that will be accessing the protected API. This can be a web application (e.g. ASP.Net MVC), a javascript application (e.g. Angular) or a native mobile application
  • Scope: A Scope essentially represents the intent of the client. This is what gives a client access to the API
  • Identity Resource: This represents the claims for an authenticated user. E.g. User’s profile information
  • API Resource: This is the protected web API that the client wants to access

We will create a class called Config and add these configurations that will later be used to configure Identity Server:

public static class Config
{
    public static IEnumerable<ApiScope> Scopes() =>
        new List<ApiScope> {new ApiScope("weatherapi", "Full access to weather api")};

    public static IEnumerable<ApiResource> Apis() =>
        new List<ApiResource>
        {
            new ApiResource("weatherapi", "Weather Service"){Scopes = {"weatherapi"}}
        };

    public static IEnumerable<IdentityResource> Resources() =>
        new List<IdentityResource>
        {
            new IdentityResources.OpenId(), 
            new IdentityResources.Profile()
        };

    public static IEnumerable<Client> Clients(string apiUrl) =>
        new List<Client>
        {
            new Client
            {
                ClientId = "weatherapi_swagger",
                ClientName = "Weather API Swagger UI",

                AllowedGrantTypes = GrantTypes.Code,
                RequirePkce = true,
                RequireClientSecret = false,

                RedirectUris = {$"{apiUrl}/swagger/oauth2-redirect.html"},
                AllowedCorsOrigins = {$"{apiUrl}"},
                PostLogoutRedirectUris = {$"{apiUrl}/swagger/"},
                AllowedScopes = { "weatherapi" }
            }
        };
}

Once this is in place, we can configure the Identity server in Startup.cs:

public void ConfigureServices(IServiceCollection services)
{
    services.AddIdentityServer()
            .AddInMemoryClients(Config.Clients("http://localhost:5001"))
            .AddInMemoryApiScopes(Config.Scopes())
            .AddInMemoryApiResources(Config.Apis())
            .AddInMemoryIdentityResources(Config.Resources())
            .AddDeveloperSigningCredential();

    services.AddControllers();
    services.AddControllersWithViews();
    services.AddRazorPages();
}

public void Configure(IApplicationBuilder app, IWebHostEnvironment env)
{
    if (env.IsDevelopment())
    {
        app.UseDeveloperExceptionPage();
    }

    app.UseStaticFiles();
    app.UseIdentityServer();
    app.UseRouting();
    app.UseEndpoints(endpoints =>
    {
        endpoints.MapDefaultControllerRoute();
        endpoints.MapControllers();
    });
}

Essentially, that is all that is required to setup Identity Server at the bare minimum. In this description, we have added a minimal setup, including in-memory configuration of clients, resources and scopes.

In the next post, we have a lot of ground to cover. We will look at moving these configurations to a database using Entity Framework Core, using migrations and configuring the Identity Server Configuration database and PersistedGrant database stores. (Part 2 Link Coming Shortly.)

Enjoy!

Web API: Supporting data shaping


Usually while building high availability Web API’s, where you know that typically your business objects are quite complex with a lot of properties returned as a part of the object, to the client, one would ideally like to give the client the ability to be able to request a specific number of fields.

That’s understandable from the business point of view and also giving the client a little more control over what they want to get from the API. Although, from the technical side of things, it does pose a few questions:

  1. How do you want to get the fields requested from the client
  2. How to you manage the scenarios where the client requested some navigation properties (and only specific fields within the navigation property)
  3. How to structure the result returned

I am going to try to address this functionality and these points through an example and for the sake of brevity my objects will be a lot simpler to demonstrate the use case in question.

Lets say we have two objects called Trip and Stop, that are defined as:

public class Trip
{
     public int Id { get; set; }
     public string Name { get; set; }
     public string Description { get; set; }
     public DateTime StartDate { get; set; }
     public DateTime? EndDate { get; set; }
     public virtual ICollection<Stop> Stops { get; set; }
}

public class Stop
{
	public int Id { get; set; }
	public string Name { get; set; }
	public DateTime ArrivalDate { get; set; }
	public DateTime? DepartureDate { get; set; }
	public decimal Latitude { get; set; }
	public decimal Longitude { get; set; }

	public virtual int TripId { get; set; }
	public virtual Trip Trip { get; set; }
}

And you have a REST endpoint that implements [HTTPGET] and returns a list of trips. Now the user might only be interested in getting the Name and a list of Stops within a trip for all the trips that are returned. So we need to tell the API the fields that the user wants to request.
Below is one way that this scenario can be addressed.

[HttpGet]
public IHttpActionResult Get(string fields="all")
{
	try
	{
		var results = _tripRepository.Get();
		if (results == null)
			return NotFound();
		// Getting the fields is an expensive operation, so the default is all,
		// in which case we will just return the results
		if (!string.Equals(fields, "all", StringComparison.OrdinalIgnoreCase))
		{
			var shapedResults = results.Select(x => GetShapedObject(x, fields));
			return Ok(shapedResults);
		}
		return Ok(results);
	}
	catch (Exception)
	{
		return InternalServerError();
	}
}

public object GetShapedObject<TParameter>(TParameter entity, string fields)
{
	if (string.IsNullOrEmpty(fields))
		return entity;
	Regex regex = new Regex(@"[^,()]+(\([^()]*\))?");
	var requestedFields = regex.Matches(fields).Cast<Match>().Select(m => m.Value).Distinct();
	ExpandoObject expando = new ExpandoObject();

	foreach (var field in requestedFields)
	{
		if (field.Contains("("))
		{
			var navField = field.Substring(0, field.IndexOf('('));

			IList navFieldValue = entity.GetType()
										?.GetProperty(navField, BindingFlags.IgnoreCase | BindingFlags.Instance | BindingFlags.Public)
										?.GetValue(entity, null) as IList;
			var regexMatch = Regex.Matches(field, @"\((.+?)\)");
			if (regexMatch?.Count > 0)
			{
				var propertiesString = regexMatch[0].Value?.Replace("(", string.Empty).Replace(")", string.Empty);
				if (!string.IsNullOrEmpty(propertiesString))
				{
					string[] navigationObjectProperties = propertiesString.Split(new[] { ',' }, StringSplitOptions.RemoveEmptyEntries);

					List<object> list = new List<object>();
					foreach (var item in navFieldValue)
					{
						list.Add(GetShapedObject(item, navigationObjectProperties));
					}

					((IDictionary<string, object>)expando).Add(navField, list);
				}
			}
		}
		else
		{
			var value = entity.GetType()
							  ?.GetProperty(field, BindingFlags.IgnoreCase | BindingFlags.Instance | BindingFlags.Public)
							  ?.GetValue(entity, null);
			((IDictionary<string, object>)expando).Add(field, value);
		}
	}

	return expando;
}

///
<summary>
/// Creates an object with only the requested properties by the client
/// </summary>

/// <typeparam name="TParameter">Type of the result</typeparam>
/// <param name="entity">Original entity to get requested properties from</param>
/// <param name="fields">List of properties requested from the entity</param>
/// <returns>Dynamic object as result</returns>
private object GetShapedObject<TParameter>(TParameter entity, IEnumerable<string> fields)
{
	ExpandoObject expando = new ExpandoObject();
	foreach (var field in fields)
	{
		var value = entity.GetType()
						  ?.GetProperty(field, BindingFlags.IgnoreCase | BindingFlags.Public | BindingFlags.Instance)
						  ?.GetValue(entity, null);
		((IDictionary<string, object>)expando).Add(field, value);
	}
	return expando;
}

So, this allows the user to pass in the query string, a comma separated list of strings that specifies the names of the fields that he wants to be returned such as:

http://localhost:2365/api/trips?fields=name,stops(name,latitude,longitude)

and that would just contain the requested fields (thanks to ExpandoObject class) that helps us construct the object and return the results back to the client as below:

{
	"totalCount": 2,
	"resultCount": 2,
	"results": [
		{
			"name": "Trip to Scandanavia",
			"stops": [
				{
					"name": "Denmark",
					"latitude": 73.2323,
					"longitude": 43.2323
				}
			]
		},
		{
			"name": "Trip to Europe",
			"stops": [
				{
					"name": "Germany",
					"latitude": 72.37657,
					"longitude": 42.37673
				},
				{
					"name": "France",
					"latitude": 72.22323,
					"longitude": 42.3434
				}
			]
		}
	]
}

And that’s all. You can of course build on this approach and add support for multiple nested navigation fields support. Happy coding!