Securing Asp.Net Core Web API with Identity Server (Part 5)


This is part 5 of a 5 part series:

In this last part, we are going to create our web api and secure access to it using the Identity Server implementation that we created in the previous parts.

We will also add Swagger support as a client for testing the api, and look at how Identity Server flow can be integrated within Swagger.

As has been the theme in the previous post in this series, I will cover the most interesting and important bits and snippets here. The completed source code is available in my Github repository

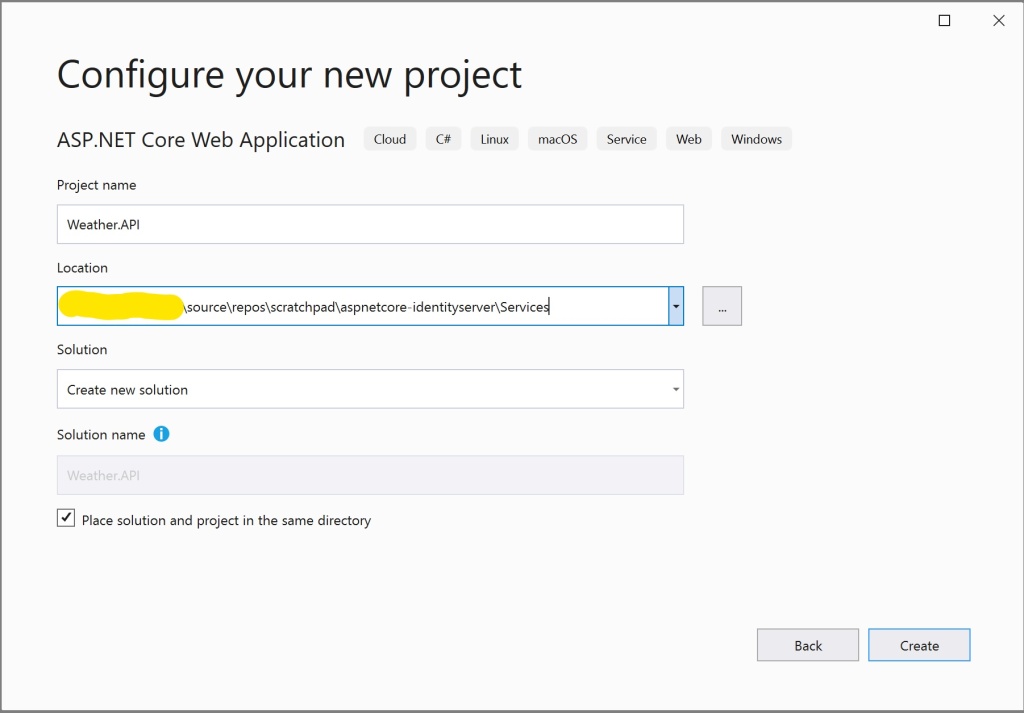
So let’s start by creating a new Asp.Net Core Web application. Basic steps are:

This will create a default Web API project with a default “WeatherForecastController” and the model “WeatherForecast“. We are going to work with these, as its enough to prove our use case.

We will only need the following 2 Nuget packages:

Configuring Identity Server integration

Startup.cs

We will register the Identity Server 4 authentication services to enable authentication support in our API

public void ConfigureServices(IServiceCollection services)
{
	...
    services.AddAuthentication(IdentityServerAuthenticationDefaults.AuthenticationScheme)
            .AddIdentityServerAuthentication(options =>
            {
                options.ApiName = "weatherapi";
                options.Authority = Configuration.GetValue<string>("IdentityProviderBaseUrl");
                options.RequireHttpsMetadata = Environment.IsProduction();
            });

    services.AddControllers()
            .AddMvcOptions(options => options.Filters.Add(new AuthorizeFilter()));
	...
}

public void Configure(IApplicationBuilder app, IWebHostEnvironment env)
{
	if (env.IsDevelopment()) { app.UseDeveloperExceptionPage(); }

	app.UseRouting();

	app.UseAuthentication();
	app.UseAuthorization();

	app.UseEndpoints(endpoints =>
	{
		endpoints.MapDefaultControllerRoute();
	});
}

A few inportant points to note are:

  • IdentityProviderBaseUrl is read from the appsettings.json and points to our IdentityServer project i.e. (http://localhost:5000)
  • AuthorizeFilter: In our case, since we want to secure all the endpoints in the API, we add a global Authorize filter. Alternatively, you can add it as a controller attribute if you need to support publicly accessible resources on your API
  • Authentication and Authorization middlewares: In the “Configure” method, the “UseAuthentication()” and “UseAuthorization()” middlewares should be registered after “UseRouting()” and before “UseEndpoints()“.

Adding and configuring Swagger support

We will use Swagger and Swagger UI, which is going to act as a Client, to help us testing the API. Since we are using Swagger UI as the client, we need to make sure that we configure our API to correctly enable passing the Client credentials and request the correct Scope to get the Access Token issued from our Identity Server.

If you remember, we configured a Client setting in our Identity Server called “weatherapi_swagger“, using the “AuthenticationCode + PKCE” grant type. So let’s configure Swagger.

Startup.cs

public void ConfigureServices(IServiceCollection services)
{
	...
	
    services.AddSwaggerGen(options =>
    {
        options.SwaggerDoc("v1", new OpenApiInfo
        {
            Title = "Weather Forecast API",
            Version = "v1"
        });
        options.AddSecurityDefinition("oauth2", new OpenApiSecurityScheme
        {
            Type = SecuritySchemeType.OAuth2,
            Flows = new OpenApiOAuthFlows
            {
                AuthorizationCode = new OpenApiOAuthFlow
                {
                    AuthorizationUrl = new Uri($"{Configuration.GetValue<string>("IdentityProviderBaseUrl")}/connect/authorize"),
                    TokenUrl = new Uri($"{Configuration.GetValue<string>("IdentityProviderBaseUrl")}/connect/token"),
                    Scopes = new Dictionary<string, string>
                    {
                        ["weatherapi"] = "Weather API"
                    }
                }
            }
        });
        options.OperationFilter<AuthorizeOperationFilter>();
    });
	
	...
}

I have highlighted the most important lines of code above. Let’s go over them in a bit more detail:

  • Security Scheme Name: In line 12, the first parameter for the “AddSecurityDefinition” method, is the Security Scheme Name as per Swagger specification. This doesn’t need to be “oauth2” but, needs to be unique accross security definitions. The importance of the Scheme name will be apparent, when we look at the “AuthorizeOperationFilter”
  • OpenApiAuthFlow: In lines 17-25, we configure the AuthorizationCode auth flow. Every OAuth provider, must define a set of well known endpoints for a set of well known operations such as, authorize, issue access token, read user metadata etc. Since we are using IdentityServer as our Identity porvider, you can find a list of these endpoints here. The 2 endpoints we are using here are:
    • Authorize Endpoint: This endpoint is used to interact with the resource owner and obtain an authorization grant
    • Token Endpoint: This endpoint is used to obtain an access and/or ID token by presenting an authorization grant obtained via the “Authorize endpoint” or refresh token
  • OperationFilter: In line 28, we define a custom operation filter and register it with Swagger. Operation filters in Swagger enable use to specify custom behavior for the all/selective operations defined in the swagger specification. Let’s look at its implementation and discuss it in more detail below:

AuthorizeOperationFilter.cs

public class AuthorizeOperationFilter : IOperationFilter
{
	public void Apply(OpenApiOperation operation, OperationFilterContext context)
	{
		// Since all the operations in our api are protected, we need not
		// check separately if the operation has Authorize attribute
		operation.Responses.Add("401", new OpenApiResponse { Description = "Unauthorized" });
		operation.Responses.Add("403", new OpenApiResponse { Description = "Forbidden" });

		operation.Security = new List<OpenApiSecurityRequirement>
		{
			new OpenApiSecurityRequirement
			{
				[
					new OpenApiSecurityScheme
					{
						Reference = new OpenApiReference {Type = ReferenceType.SecurityScheme, Id = "oauth2"}
					}
				] = new[] {"weatherapi"}
			}
		};
	}
}
  • 401 and 403 responses: The first thing that the operation filter does, is that it instructs swagger that all the endpoints in the specification can produce a 401 (Unauthorized) and 403 (Forbidden) response types.
  • SecurityScheme: Notice the Id of OpenApiSecurityScheme on line 17. This must match the Security Scheme Name that we earlier, defined in the “AddSecurityDefinition” configuration

The last thing pending is to register the Swagger and Swagger UI middlewares with our middleware pipeline

...
app.UseAuthentication();
app.UseAuthorization();
app.UseSwagger()
    .UseSwaggerUI(options =>
    {
        options.SwaggerEndpoint("/swagger/v1/swagger.json", "Weather API");
        options.OAuthClientId("weatherapi_swagger");
        options.OAuthAppName("Weather API");
        options.OAuthUsePkce();
    });
...

Its important to note here:

  • OAuthClientId: This is the Client Id as configured in the Identity Server project
  • OAuthAppName: This can be any descriptive name you want to give your API
  • OAuthUsePkce: This is required since we have configured AuthorizationCode + PKCE grant type for this client.

And that’s all.

Testing

Since we are using Visual Studio, we can setup our solution to start both our projects:
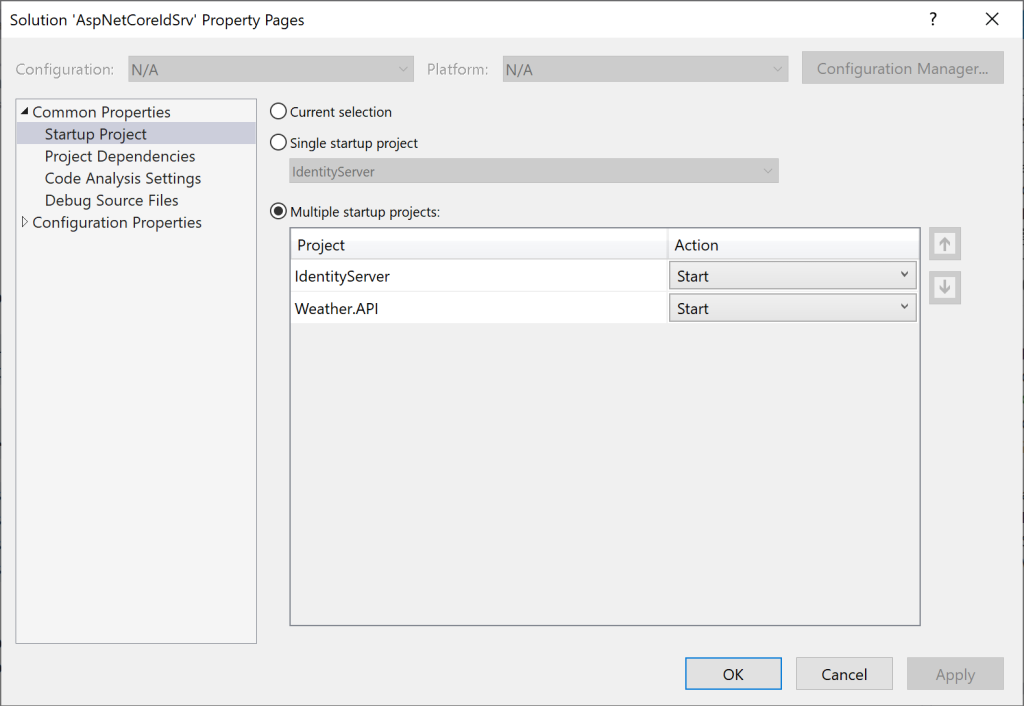
Press F5 and this should launch both the IdentityServer and the Weather.API web applications in separate browser windows with Weather.API project displaying the Swagger UI
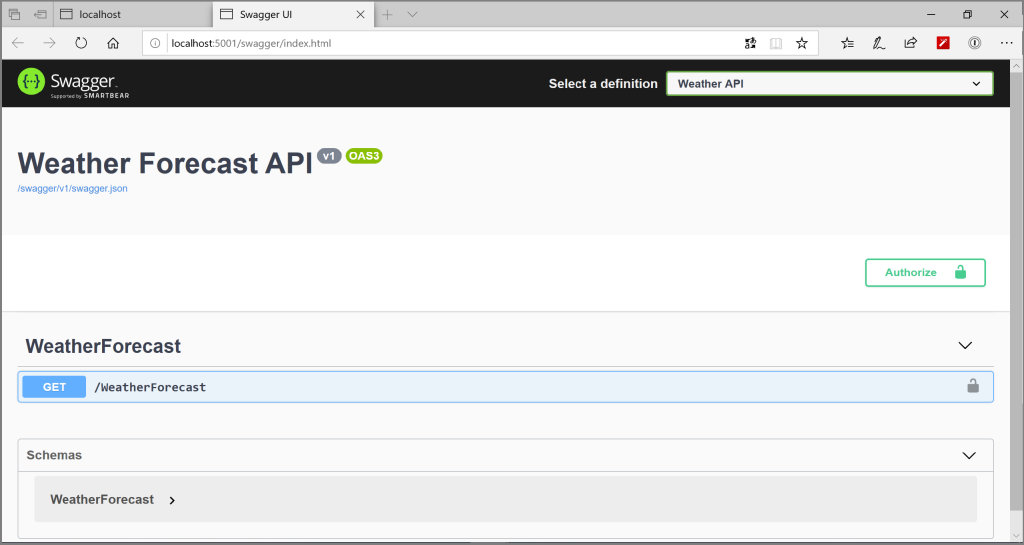
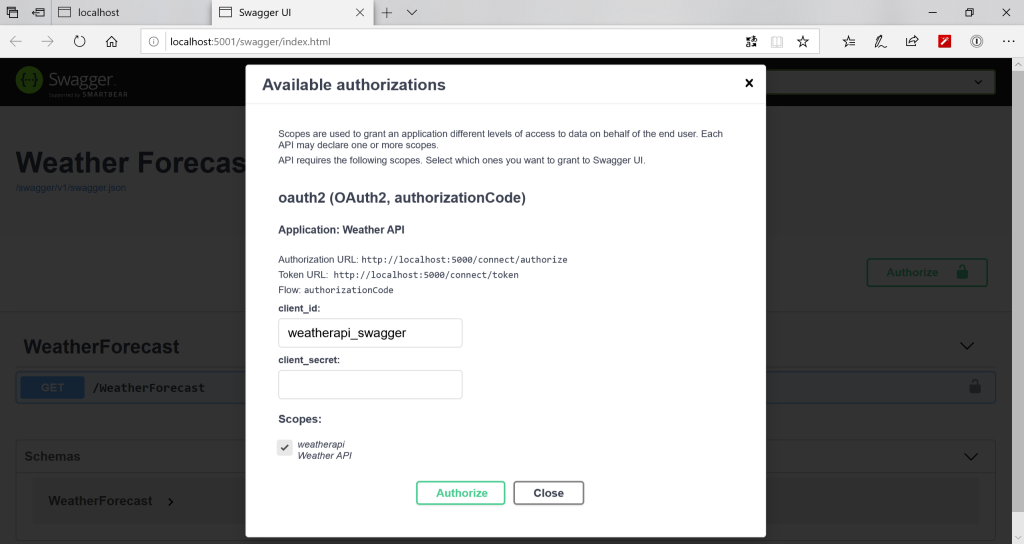
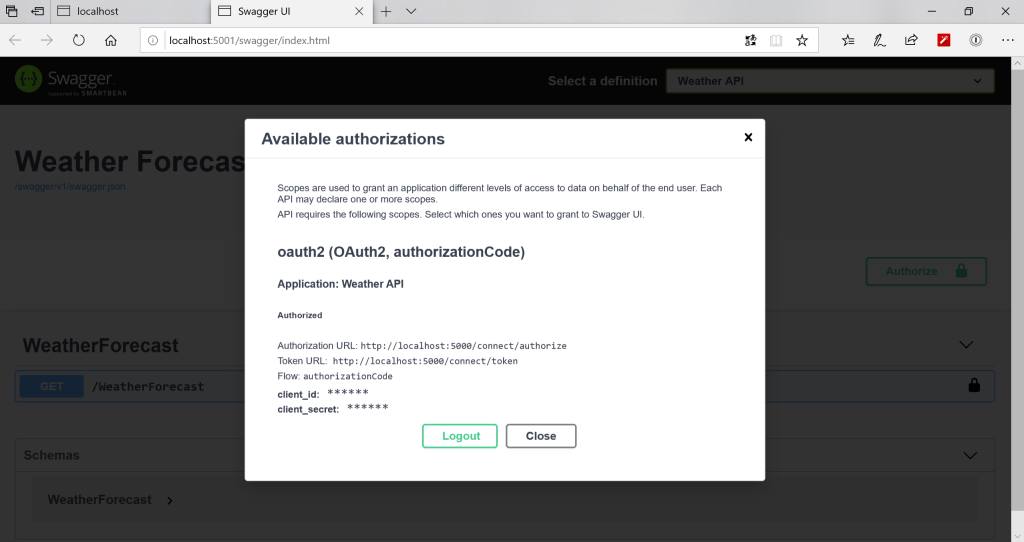
Click on “Authorize

Select the “weatherapi” scope and click on “Authorize“. (Note: Since we made the “Client Secret” for this client optional in our Identity Server configuration, its not required to provide it here). This should redirect us to the Login page that we created earlier in our Identity Sever project
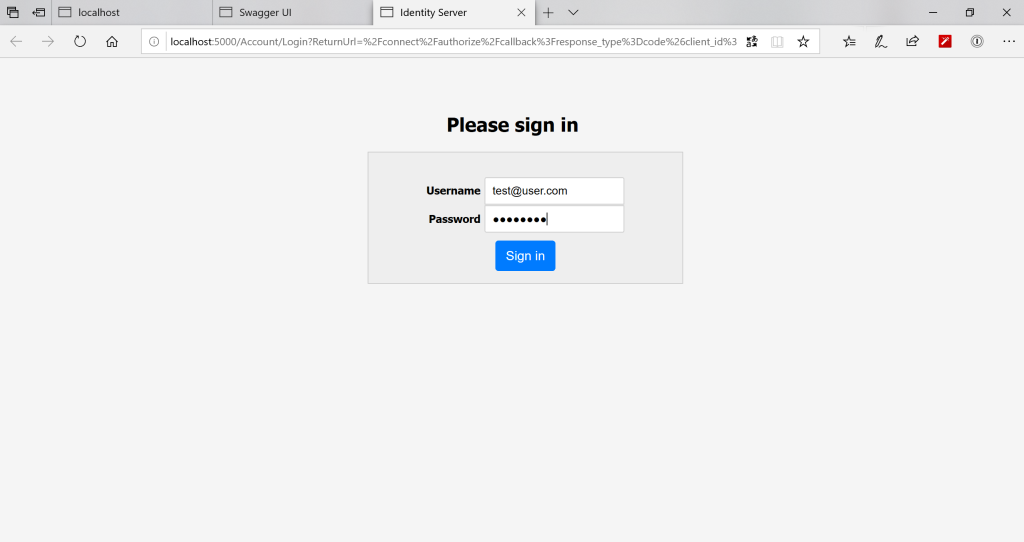
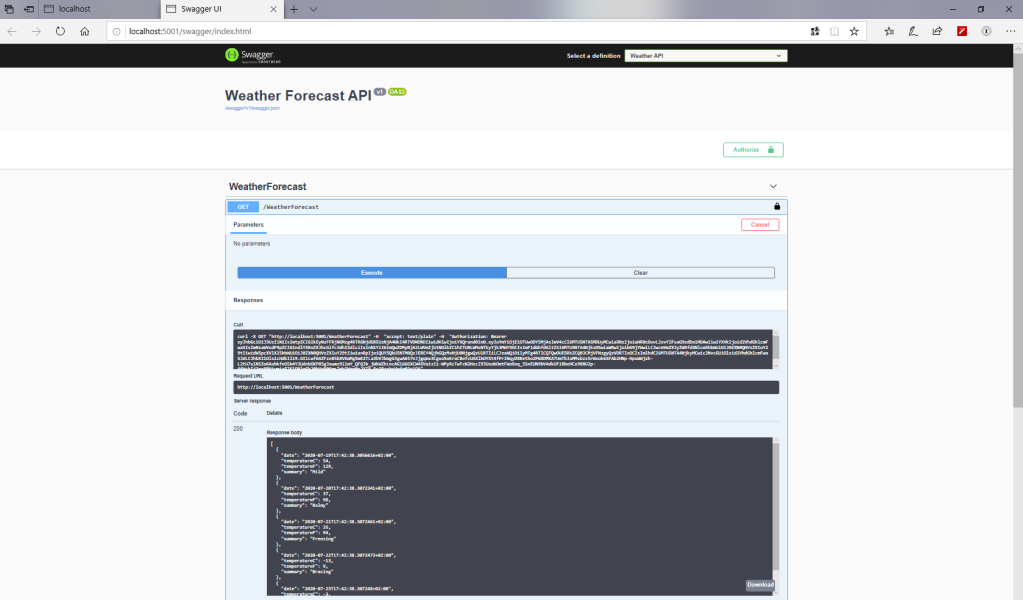
Enter the username and password and click “Sign In“. If the credentials provided are correct, this should redirect us back to the Swagger UI for our Weather.API browser window
Click “Close” and notice that the “Lock” sign on the get operation is now secured. You can try fetching the weather forecasts and it should give us the result as shown in the image below:
All done, we have secured our API!! Hope this series have been helpful. As always, all the source code is updated on the Githib Repository.

Happy Coding!!

Securing Asp.Net Core Web API with Identity Server (Part 4)


This is part 4 of a 5 part series:

Now that we have Identity Server setup and ASP.Net identity configured and setup with Entity Framework Core, we are all set to start implementing User authentication. The basic steps involved are:

  • Creating an AccountController with Login actions
  • Creating a Login view model for capturing user login requests
  • Creating a Login page
  • Implementing a User profile service to read user claims

So let’s get cracking.

LoginViewModel.cs (IdentityServer -> Models)

public class LoginViewModel
{
    [Required]
    [EmailAddress]
    public string Username { get; set; }

    [Required]
    [DataType(DataType.Password)]
    public string Password { get; set; }

    public string ReturnUrl { get; set; }
}

Next, create a Controllers folder in the IdentityServer project and add an MVC controller by selecting “New scaffolded item” and name it AccountController and define an action for Login.

AccountController.cs

[HttpGet]
public async Task<IActionResult> Login(string returnUrl)
{
    var context = await _interactionService.GetAuthorizationContextAsync(returnUrl);

    ViewData["ReturnUrl"] = returnUrl;
    return View(new LoginViewModel { ReturnUrl = returnUrl, Username = context?.LoginHint });
}

[HttpPost]
[ValidateAntiForgeryToken]
public async Task<ActionResult> Login(LoginViewModel model)
{
    if (!ModelState.IsValid)
    {
        ViewData["ReturnUrl"] = model.ReturnUrl;
        return View(model);
    }

    var user = await _userManager.FindByNameAsync(model.Username);
    if (!await _userManager.CheckPasswordAsync(user, model.Password))
    {
        ModelState.AddModelError("", "Invalid username or password");
        return View(model);
    }

    var properties = new AuthenticationProperties
    {
        ExpiresUtc = DateTimeOffset.UtcNow.AddMinutes(120),
        AllowRefresh = true,
        RedirectUri = model.ReturnUrl
    };

    await _signInManager.SignInAsync(user, properties);
    return Redirect(_interactionService.IsValidReturnUrl(model.ReturnUrl) ? model.ReturnUrl : "~/");
}

Important things to note here:

  • We are using ASP.Net Identity’s UserManager to Validate the user’s credentials, and the SignInManager to create the authentication metadata
  • By default, the authentication metadata expires after 120 minutes, but if you wanted to implement a “Remember Me” functionality, you could set it to a longer period and mark the “IsPersistent” flag to true for the AuthenticationProperties

Login View (IdentityServer -> Views -> Account)

@model IdentityServer.Models.LoginViewModel

@{
    ViewData["Title"] = "Login";
}

<div class="text-center">
    <form asp-controller="Account" asp-action="Login" method="post" asp-route-returnUrl="@ViewData["ReturnUrl"]">
        <input type="hidden" asp-for="ReturnUrl" />
        <div asp-validation-summary="All" class="text-danger"></div>

        <div class="form-group">
            <label asp-for="Username">Username</label>
            <input asp-for="Username" type="email" placeholder="Username" />
            <span asp-validation-for="Username" class="text-danger"></span>
        </div>

        <div class="form-group">
            <label asp-for="Password">Password</label>
            <input asp-for="Password" type="password" placeholder="Password" />
            <span asp-validation-for="Password" class="text-danger"></span>
        </div>
        
        <div>
            <button type="submit">Sign in</button>
        </div>
    </form>
</div>

@section Scripts {
    @{await Html.RenderPartialAsync("_ValidationScriptsPartial");}
}

IProfileService

By default Identity Server only has information about the claims in the Authentication cookie. When creating a token, Identity Server more often requires additional information about the user, such as user profile data. This information is available in the AspNetUsers table and can be loaded as claims when generating tokens.

For this purpose, Identity Server provides an extension point to load these additional claims, by allowing users to provide an implementation of the IProfileService interface. So, we will provide our own implementation of it.

UserProfileService.cs (IdentityServer -> Services)

public async Task GetProfileDataAsync(ProfileDataRequestContext context)
{
    var subject = context.Subject ?? throw new ArgumentNullException(nameof(context.Subject));
    var subClaimValue = subject.Claims.FirstOrDefault(x => x.Type == "sub")?.Value;

    var user = await _userManager.FindByIdAsync(subClaimValue);
    if (user == null)
        throw new ArgumentException("Invalid sub claim");

    // Here we can add mode user claims as per requirements
    context.IssuedClaims = new List<Claim>
    {
        new Claim(JwtClaimTypes.Subject, user.Id),
        new Claim(JwtClaimTypes.PreferredUserName, user.UserName),
        new Claim(JwtRegisteredClaimNames.UniqueName, user.UserName)
    };
}

public async Task IsActiveAsync(IsActiveContext context)
{
    var subject = context.Subject ?? throw new ArgumentNullException(nameof(context.Subject));
    var subClaimValue = subject.Claims.FirstOrDefault(x => x.Type == "sub")?.Value;

    var user = await _userManager.FindByIdAsync(subClaimValue);
    context.IsActive = false;

    if (user != null)
    {
        if (_userManager.SupportsUserSecurityStamp)
        {
            var stamp = subject.Claims.FirstOrDefault(x => x.Type == "security_stamp")?.Value;
            if (!IsNullOrWhiteSpace(stamp))
            {
                var securityStampFromDatabase = await _userManager.GetSecurityStampAsync(user);
                if (stamp != securityStampFromDatabase)
                    return;
            }
        }

        context.IsActive = !user.LockoutEnabled || !user.LockoutEnd.HasValue || user.LockoutEnd < DateTime.UtcNow;
    }
}

As you can see in lines 11-16 we are adding claims for the user that would be present in the access token (as we will see shortly).

And lastly, we need to register this service with the dependency container.

Startup.cs (Update on line number 12)

services.AddIdentityServer()
        .AddDeveloperSigningCredential()
        .AddAspNetIdentity<ApplicationUser>()
        .AddConfigurationStore(options =>
        {
            options.ConfigureDbContext = builder => AddDbContext(builder, Configuration);
        })
        .AddOperationalStore(options =>
        {
            options.ConfigureDbContext = builder => AddDbContext(builder, Configuration);
        })
        .Services.AddTransient<IProfileService, UserProfileService>();

That’s pretty much all there is to authenticate the users.

Testing

Since we haven’t developed our weather API yet, we are going to use Postman to test this authentication and token generation flow to make sure everything is in place.

Step 1: Open Postman and in the “Authorization” tab, select “OAuth2.0″ and click on “Generate New Access Token” button.

Step 2: Enter the information as in the figure below. This corresponds to the Identity Server Client and Resource configuration we provided earlier. Click on the “Request Token” button.

Step 3: This should present the “Login” page that we created from our AccountController. Enter the user credentials of the default user we created in our ApplicationDataSeeder class.

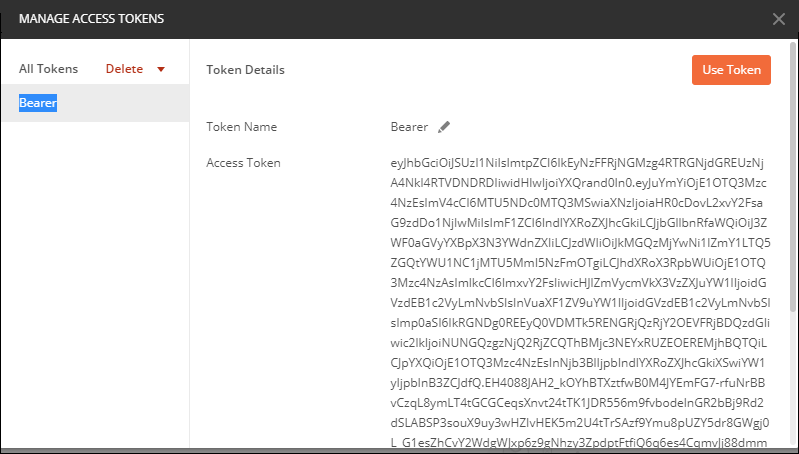
Step 4: If everything was setup and configured as intended, we should see the “Access Token” issued by the Identity Server.

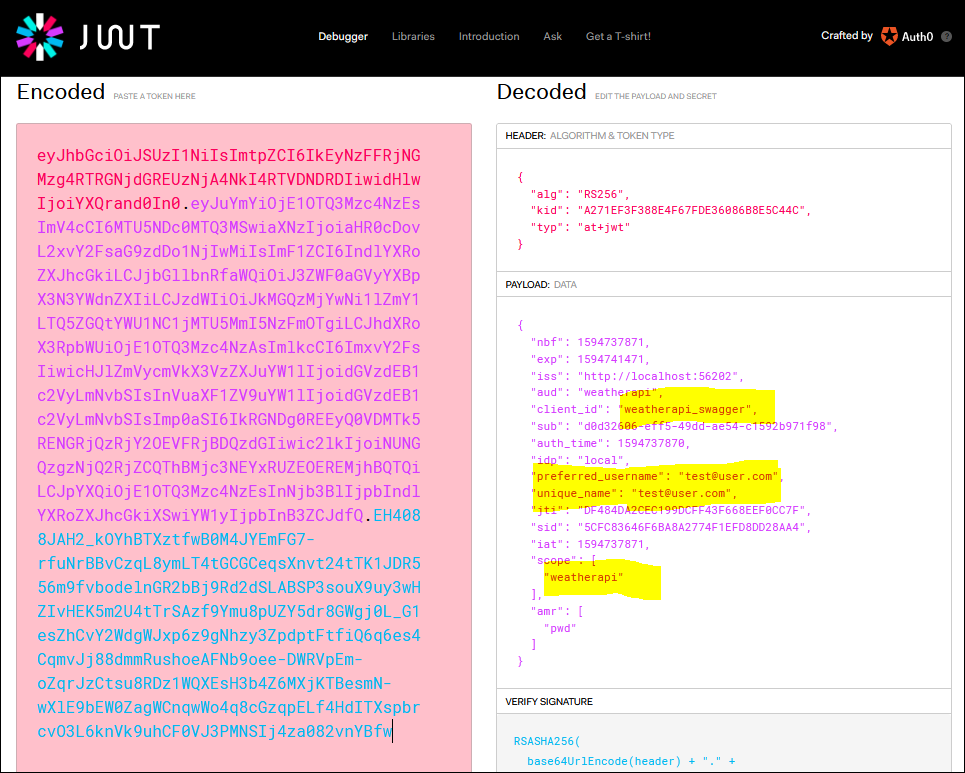
Step 5: To verify the Access Token (and that it has the claims that we added), go to JWT.IO and paste the token in the Encoded field.

The token does contain the claims that we added. A few things to verify here:

  • Issuer (iss): This should be our Identity Server URL
  • Audience (aud): This should be the API resource we created in our Identity server configuration
  • Subject (sub): This should be the User ID of our user in the database
  • Client (client_id): This is the client requesting the token
  • Scope: This is the scope this client has access to and was requested

Apart from this, we also added 2 additional claims in our UserProfileService that we can also see in the access token:

  • preferred_username
  • unique_name

Everything looks good.

My Github repository is updated with the code and some more optimizations. Check it out here.

In the last part, we will create our Weather API and hook it up to the Identity Server

Happy coding!!

Securing Asp.Net Core Web API with Identity Server (Part 3)


This is part 3 of a 5 part series:

In Part 2 we moved all the Identity Server configurations to the database using Identity Server’s Entity Framework Core integration support.

In this part, we are going to add ASP.Net Identity support to facilitate user authentication (which we are going to cover in detail in Part 4). What we cover in this post is going to lay the ground work for authenticating and authorizing users and requesting access to the protected API’s, all while secured by our Identity Server implementation. So lets dive straight into it.

Install the following packages into the IdentityServer.csproj project

We will provide a custom implementation of the IdentityUser class in ASP.Net Identity framework. This gives us an opportunity to add custom data to our user (depending on the application requirements).

ApplicationUser.cs

public class ApplicationUser: IdentityUser { }

Next we will provide an implementation of a class that represents a DbContext for our application to communicate with the ASP.Net Identity specific entities in the database.

ApplicationDbContext.cs

public class ApplicationDbContext: IdentityDbContext<ApplicationUser>
{
    public ApplicationDbContext(DbContextOptions<ApplicationDbContext> options)
        : base(options) { }
}

Next we will register the ApplicationDbContext with the ASP.Net core dependency injection container. We will also register the ASP.Net Identity services with the dependency container.

Startup.cs

services.AddDbContext<ApplicationDbContext>(options => AddDbContext(options, Configuration));
services.AddIdentity<ApplicationUser, IdentityRole>()
        .AddEntityFrameworkStores<ApplicationDbContext>()
        .AddDefaultTokenProviders();

services.AddIdentityServer()
        .AddDeveloperSigningCredential()
        .AddAspNetIdentity<ApplicationUser>()
        .AddConfigurationStore(options =>
        {
            options.ConfigureDbContext = builder => AddDbContext(builder, Configuration);
        })
        .AddOperationalStore(options =>
        {
            options.ConfigureDbContext = builder => AddDbContext(builder, Configuration);
        });

Next we will create a data seeder class for our ApplicationDbContext that will create a default ApplicationUser in the database. We can use this default user for testing.

ApplicationDataSeeder.cs

public class ApplicationDataSeeder
{
    private readonly IPasswordHasher<ApplicationUser> _hasher = new PasswordHasher<ApplicationUser>();

    public async Task SeedAsync(ApplicationDbContext context)
    {
        if (!context.Users.Any())
        {
            var user = new ApplicationUser
            {
                UserName = "test@user.com",
                Email = "test@user.com",
                EmailConfirmed = true,
                PhoneNumber = "1212121212",
                PhoneNumberConfirmed = true,
                SecurityStamp = Guid.NewGuid().ToString("D")
            };
            user.PasswordHash = _hasher.HashPassword(user, "Test123@");

            await context.Users.AddAsync(user);
            await context.SaveChangesAsync();
        }
    }
}

Once this is in place, you might have guessed the next step. Yes, we need to update our Progam.cs to call the ApplicationDataSeeder. I have made some changes to Program.cs since the last post.

Program.cs

private static async Task MigrateDatabaseAsync<TContext>(TContext context, Func<Task> seeder)
    where TContext : DbContext
{
    await context.Database.EnsureCreatedAsync();
    await seeder();
    await context.Database.MigrateAsync();
}

public static async Task Main(string[] args)
{
    var configuration = GetConfiguration();
    Log.Logger = CreateLogger(configuration);

    try
    {
        Log.Information("Starting configuring the host...");
        var host = CreateHostBuilder(args).Build();

        Log.Information("Starting applying database migrations...");
        using var scope = host.Services.CreateScope();

        var applicationDbContext = scope.ServiceProvider.GetRequiredService<ApplicationDbContext>();
        await MigrateDatabaseAsync(applicationDbContext,
            async () => await new ApplicationDataSeeder().SeedAsync(applicationDbContext));

        var configurationContext = scope.ServiceProvider.GetRequiredService<ConfigurationDbContext>();
        await MigrateDatabaseAsync(configurationContext,
            async () => await new ConfigurationDataSeeder().SeedAsync(configurationContext, configuration));

        var persistedGrantDbContext = scope.ServiceProvider.GetRequiredService<PersistedGrantDbContext>();
        await MigrateDatabaseAsync(persistedGrantDbContext, () => Task.CompletedTask);

        Log.Information("Starting the host...");
        await host.RunAsync();
    }
    catch (Exception exception)
    {
        Log.Fatal(exception, "Program terminated unexpectedly");
        throw;
    }
    finally { Log.CloseAndFlush(); }
}

Once all this is in place, the last step to configure ASP.Net Identity is to create the database migrations that will create the required tables in the database.

To run the migrations you will need dotnet tools. Below is the list of commands to install the required tooling and create and run the migrations:

ActionCommand
Install dotnet toolsdotnet tool install –global dotnet-ef
Create Migrationsdotnet ef migrations add Initial-AspNetIdentity-Create –context ApplicationDbContext
Update databasedotnet ef database update –context ApplicationDbContext

And that’s all. This should create the required database structure. Running the application now will run the data seeder and create the default user in the database.

My Github repository is updated with the code and some more optimizations. Check it out here.

In Part 4 we will cover integrating ASP.Net Identity and Identity server to authenticate and authorize the users.

Securing Asp.Net Core Web API with Identity Server (Part 2)


This is part 2 of a 5 part series:

In the previous post, we looked at how to setup Identity Server with a bare bone ASP.Net core application.

In production, more often than not, you would have your configurations (clients, scopes, resources etc.) in a database rather than defined in code. It makes sense, and gives more flexibility and scalability when integrating authentication and authorization flows.

In this part, we will look at moving our Identity Server configurations into a more persistent store. We will be using SQL Server, but the data store can be of your choosing. So let’s get started.

Install the following nuget packages into IdentityServer.csproj project:

Next, we need to define a connection string in appsettings.json file that points to the SQL server instance on your machine.

  "ConnectionStrings": {
    "IdentityDbConnectionName": "Server=localhost\\SQLEXPRESS;Database=IdentityDb;Trusted_Connection=True;"
  },
  "WeatherApiClient": "http://localhost:5001" 

Next, we modify the Startup.cs from the earlier post to configure Identity Server’s Configuration and Operational store to point to the database as defined in the connection string.

private static DbContextOptionsBuilder AddDbContext(DbContextOptionsBuilder builder,
    IConfiguration configuration) =>
    builder.UseSqlServer(configuration.GetConnectionString("IdentityDbConnectionName"),
        sqlOptions =>
        {
            sqlOptions.MigrationsAssembly(typeof(Startup).Assembly.FullName);
            sqlOptions.EnableRetryOnFailure(5, TimeSpan.FromSeconds(10), null);
        });

public void ConfigureServices(IServiceCollection services)
{
    services.AddIdentityServer()
            .AddDeveloperSigningCredential()
            .AddConfigurationStore(options =>
            {
                options.ConfigureDbContext = builder => AddDbContext(builder, Configuration);
            })
            .AddOperationalStore(options =>
            {
                options.ConfigureDbContext = builder => AddDbContext(builder, Configuration);
            });
            
    services.AddControllers();
    services.AddControllersWithViews();
    services.AddRazorPages();
}

Now that this is in place, let’s create a Data seeder class that will seed the initial Identity Server configuration data to the database. We will use the configuration data defined earlier in the Config.cs.

Pay attention to line 5. (I have added the URL for the Weather API (that we will create in part 4) to appsettings.json)

public class ConfigurationDataSeeder
{
    public async Task SeedAsync(ConfigurationDbContext context, IConfiguration configuration)
    {
        var clientUrl = configuration.GetValue<string>("WeatherApiClient");

        if (!context.Clients.Any())
        {
            foreach (var client in Config.Clients(clientUrl))
                await context.Clients.AddAsync(client.ToEntity());

            await context.SaveChangesAsync();
        }
        else
        {
            var oldRedirects = (await context.Clients.Include(c => c.RedirectUris)
                    .ToListAsync())
                    .SelectMany(c => c.RedirectUris)
                    .Where(ru => ru.RedirectUri.EndsWith("/o2c.html"))
                    .ToList();

            if (oldRedirects.Any())
            {
                foreach (var redirectUri in oldRedirects)
                {
                    redirectUri.RedirectUri = redirectUri.RedirectUri.Replace("/o2c.html", "/oauth2-redirect.html");
                    context.Update(redirectUri.Client);
                }
                await context.SaveChangesAsync();
            }
        }

        if (!context.IdentityResources.Any())
        {
            foreach (var resource in Config.Resources())
                await context.IdentityResources.AddAsync(resource.ToEntity());

            await context.SaveChangesAsync();
        }

        if (!context.ApiResources.Any())
        {
            foreach (var api in Config.Apis())
                await context.ApiResources.AddAsync(api.ToEntity());

            await context.SaveChangesAsync();
        }

        if (!context.ApiScopes.Any())
        {
            foreach (var scope in Config.Scopes())
                await context.ApiScopes.AddAsync(scope.ToEntity());

            await context.SaveChangesAsync();
        }
    }
}

The next order of business, is to make sure that the seeder is run at application startup. Running the seeder will do a few things:

  • Create the database if it doesn’t exist (this is only done once)
  • Create the tables required by the ConfigurationDbContext and PersistedGrantDbContext in the database

Program.cs

public static async Task Main(string[] args)
{
    var configuration = GetConfiguration();
    Log.Logger = CreateLogger(configuration);

    try
    {
        Log.Information("Starting configuring the host...");
        var host = CreateHostBuilder(args).Build();

        Log.Information("Starting applying database migrations...");
        using var scope = host.Services.CreateScope();

        var configurationContext = scope.ServiceProvider.GetRequiredService<ConfigurationDbContext>();
        await configurationContext.Database.EnsureCreatedAsync();
        await new ConfigurationDataSeeder().SeedAsync(configurationContext, configuration);
        await configurationContext.Database.MigrateAsync();

        var persistedGrantDbContext = scope.ServiceProvider.GetRequiredService<PersistedGrantDbContext>();
        await persistedGrantDbContext.Database.EnsureCreatedAsync();
        await persistedGrantDbContext.Database.MigrateAsync();

        Log.Information("Starting the host...");
        await host.RunAsync();
    }
    catch (Exception exception)
    {
        Log.Fatal(exception, "Program terminated unexpectedly");
        throw;
    }
    finally { Log.CloseAndFlush(); }
}

And that’s about it! When you run the application, it will create migrations at runtime and apply them to the database, creating all the required tables (including the database).

My Github repository is updated with the code and some more optimizations. Check it out here.

Part 3 coming soon!!

Securing Asp.Net Core Web API with Identity Server (Part 1)


In this series we are going to look at securing a Web API built with ASP.Net Core, using Identity Server. The technology stack we are going to work with is:

This is part 1 of a 5 part series:

Source Code

I will be posting the code for the series on my github repository, so keep an eye on that space.

Configuring Identity Server

Identity Server is by far the best framework that supports a number of OAuth 2.0 and OpenID connect specifications, which includes the PKCE (Proof Key for Code Exchange) specification as per RFC-7636 used with the Authorization Code flow. Before IETF came up with PKCE, Implicit flow was the most commonly used OAuth flow used for browser based applications.

In this series we will be looking at securing the WEB API using the Authorization Code + PKCE code flow. Let’s get cracking!

We will start by creating a bare bone ASP.Net Core application. (Note: Un-check the ‘Configure for HTTPS’ for the purpose of this demo) and install the following Nuget package:

There a few concepts that need to be understood before we can start configuring the Identity Server. Briefly:

  • Client: An application that will be accessing the protected API. This can be a web application (e.g. ASP.Net MVC), a javascript application (e.g. Angular) or a native mobile application
  • Scope: A Scope essentially represents the intent of the client. This is what gives a client access to the API
  • Identity Resource: This represents the claims for an authenticated user. E.g. User’s profile information
  • API Resource: This is the protected web API that the client wants to access

We will create a class called Config and add these configurations that will later be used to configure Identity Server:

public static class Config
{
    public static IEnumerable<ApiScope> Scopes() =>
        new List<ApiScope> {new ApiScope("weatherapi", "Full access to weather api")};

    public static IEnumerable<ApiResource> Apis() =>
        new List<ApiResource>
        {
            new ApiResource("weatherapi", "Weather Service"){Scopes = {"weatherapi"}}
        };

    public static IEnumerable<IdentityResource> Resources() =>
        new List<IdentityResource>
        {
            new IdentityResources.OpenId(), 
            new IdentityResources.Profile()
        };

    public static IEnumerable<Client> Clients(string apiUrl) =>
        new List<Client>
        {
            new Client
            {
                ClientId = "weatherapi_swagger",
                ClientName = "Weather API Swagger UI",

                AllowedGrantTypes = GrantTypes.Code,
                RequirePkce = true,
                RequireClientSecret = false,

                RedirectUris = {$"{apiUrl}/swagger/oauth2-redirect.html"},
                AllowedCorsOrigins = {$"{apiUrl}"},
                PostLogoutRedirectUris = {$"{apiUrl}/swagger/"},
                AllowedScopes = { "weatherapi" }
            }
        };
}

Once this is in place, we can configure the Identity server in Startup.cs:

public void ConfigureServices(IServiceCollection services)
{
    services.AddIdentityServer()
            .AddInMemoryClients(Config.Clients("http://localhost:5001"))
            .AddInMemoryApiScopes(Config.Scopes())
            .AddInMemoryApiResources(Config.Apis())
            .AddInMemoryIdentityResources(Config.Resources())
            .AddDeveloperSigningCredential();

    services.AddControllers();
    services.AddControllersWithViews();
    services.AddRazorPages();
}

public void Configure(IApplicationBuilder app, IWebHostEnvironment env)
{
    if (env.IsDevelopment())
    {
        app.UseDeveloperExceptionPage();
    }

    app.UseStaticFiles();
    app.UseIdentityServer();
    app.UseRouting();
    app.UseEndpoints(endpoints =>
    {
        endpoints.MapDefaultControllerRoute();
        endpoints.MapControllers();
    });
}

Essentially, that is all that is required to setup Identity Server at the bare minimum. In this description, we have added a minimal setup, including in-memory configuration of clients, resources and scopes.

In the next post, we have a lot of ground to cover. We will look at moving these configurations to a database using Entity Framework Core, using migrations and configuring the Identity Server Configuration database and PersistedGrant database stores. (Part 2 Link Coming Shortly.)

Enjoy!

MSMQ and SQL Server integration


At times we have long running SQL procedures and its not always advisable to have the application waiting on it.Especially if your application needs to perform certain set of tasks based on the result returned from the SQL operation.

There are a few approaches that one might consider to address this scenario and using the Service Broker is definitely one of them. But we are not going to look into Service Broker, rather look at how we can use Messaging Queuing with SQL Server to address this requirement.

untitled-diagram

SQL Server interaction with MSMQ

The following steps depicts the process involved.

  • The SQL Server runs a Scheduled Job that does the following
    • Execute the long running Stored procedure
    • Execute a stored procedure that sends a message to a remote Message Queue
  • Remote queue on the application server receives the message
  • Client application running on the application server polls for messages from the MSMQ. On receiving the message, the message is read from the MSMQ and application can resume its further processing

In this post we will cover all the configuration, components and environment settings including (ports, firewall rules, queue access, SQL configuration etc.) required to facilitate this setup.

.Net Class Library

This class library will simply send the message to a MSMQ. This defines a simple method that takes the queue name and the message to be delivered as parameters.

using System;
using System.Data.SqlTypes;
using System.Messaging;
using Microsoft.SqlServer.Server;

namespace SqlMsmq
{
    public class SqlToMsmqManager
    {
        /// &lt;summary&gt;
        /// Sends a message to the queue
        /// &lt;/summary&gt;
        /// &lt;param name="queueName"&gt;Full name of the queue&lt;/param&gt;
        /// &lt;param name="message"&gt;Message to send&lt;/param&gt;
        [SqlProcedure]
        public static void Send(SqlString queueName, SqlString message)
        {
            if (queueName == null || string.IsNullOrEmpty(queueName.Value))
                throw new Exception("Message queue name need to be provided");

            var queue = queueName.Value;
            if (!MessageQueue.Exists(queue))
                throw new Exception("Message queue does not exist");
            try
            {
                using (var messageQueue = new MessageQueue(queue, QueueAccessMode.Send))
                {
                    messageQueue.Formatter = new XmlMessageFormatter(new Type[] { typeof(string) });
                    messageQueue.Send(message.Value, MessageQueueTransactionType.Single);
                }
            }
            catch (Exception ex)
            {
                throw ex;
            }
        }
    }
}

SQL Server

To be able to send a message to a Message Queue from SQL Server, first of all we will need to register the System.Messaging assembly and the assembly we created above with SQL Server. Below is the script that defines different steps required in SQL Server configuration

-- STEP1: Enable CLR integration in SQL Server
SP_CONFIGURE 'clr enable', 1
GO
RECONFIGURE
GO

USE [DatabaseName]
GO
ALTER DATABASE [DatabaseName] SET TRUSTWORTHY ON
GO

-- STEP 2: Add System.Messaging assembly to the database to enable Message Queuing component
CREATE ASSEMBLY Messaging
AUTHORIZATION dbo
FROM 'C:\Windows\Microsoft.NET\Framework64\v4.0.30319\System.Messaging.dll' -- Path to the System.Messaging.dll assembly
WITH PERMISSION_SET = UNSAFE
GO

-- STEP 3: Add the external .Net assembly that will send the message to the queue
CREATE ASSEMBLY SqlToMsmq
AUTHORIZATION dbo
FROM 'C:\SqlToMsmq\SqlMsmq.dll' -- Path to the .Net class library
WITH PERMISSION_SET = UNSAFE
GO

-- STEP 4: Create procedure that will calls into the external .Net assembly to send the message
CREATE PROCEDURE [SendMsmqMessage]
	@queueName NVARCHAR(200),
	@message NVARCHAR(MAX)
AS
	EXTERNAL NAME SqlToMsmq.[SqlMsmq.SqlToMsmqManager].Send
GO

--Stored Procedure that needs to be called from the escowing SP at the end
EXEC SendMsmqMessage '<Full queue name to send the message after SP runs>', '<Message><Status>Stored procedure processed</Status></Message>'

Notes:

  • You will need to be an admin user to be able to  make the above configurations to SQL server
  • Sometimes when registering assemblies in SQL Server you would receive the error:
    "The database owner SID recorded in the master database differs from the database owner SID recorded in database.You should correct this situation by resetting the owner of database using the ALTER AUTHORIZATION statement."

    In this case run the following statement to alter the authorization on the database

ALTER AUTHORIZATION ON DATABASE::[DatabaseName] TO [LoginName]

MSMQ

Because in the class library we have instructed that the message queue is a transactional queue, we need to create a transactional queue on the application server

Environment Configuration

MSMQ communicates over ports 135, 1801, 2103/2105

  • Sending Messages

So, since our database server will be pushing the message to MSMQ, we need to have port 1801 on the database server. MSMQ uses this port to establish a network session and then push the message to the destination

  • Receiving Messages

MSMQ uses RPC for pulling messages, which requires ports 135, 2103 or 2105 open on the application server.

Environment Testing

To test that you have the required level of connectivity between your database and application server for sending MSMQ messages you should at least be able to telnet from your database server to your application server on port 1801

telnet 1801

And lastly

To send the message from your SQL Server to the MSMQ queue as defined above all we have to do is:


EXEC SendMsmqMessage 'FormatName:Direct=OS:ServerName\Private$\QueueName', '<Message>Any message</Message>'

Notes:

  • Since our queue is a private queue we need to specify the message queue name in complete format.
    • We can use either OS or TCP format specifier

And that’s it. The message should appear in the message queue.

Web API: Supporting data shaping


Usually while building high availability Web API’s, where you know that typically your business objects are quite complex with a lot of properties returned as a part of the object, to the client, one would ideally like to give the client the ability to be able to request a specific number of fields.

That’s understandable from the business point of view and also giving the client a little more control over what they want to get from the API. Although, from the technical side of things, it does pose a few questions:

  1. How do you want to get the fields requested from the client
  2. How to you manage the scenarios where the client requested some navigation properties (and only specific fields within the navigation property)
  3. How to structure the result returned

I am going to try to address this functionality and these points through an example and for the sake of brevity my objects will be a lot simpler to demonstrate the use case in question.

Lets say we have two objects called Trip and Stop, that are defined as:

public class Trip
{
     public int Id { get; set; }
     public string Name { get; set; }
     public string Description { get; set; }
     public DateTime StartDate { get; set; }
     public DateTime? EndDate { get; set; }
     public virtual ICollection<Stop> Stops { get; set; }
}

public class Stop
{
	public int Id { get; set; }
	public string Name { get; set; }
	public DateTime ArrivalDate { get; set; }
	public DateTime? DepartureDate { get; set; }
	public decimal Latitude { get; set; }
	public decimal Longitude { get; set; }

	public virtual int TripId { get; set; }
	public virtual Trip Trip { get; set; }
}

And you have a REST endpoint that implements [HTTPGET] and returns a list of trips. Now the user might only be interested in getting the Name and a list of Stops within a trip for all the trips that are returned. So we need to tell the API the fields that the user wants to request.
Below is one way that this scenario can be addressed.

[HttpGet]
public IHttpActionResult Get(string fields="all")
{
	try
	{
		var results = _tripRepository.Get();
		if (results == null)
			return NotFound();
		// Getting the fields is an expensive operation, so the default is all,
		// in which case we will just return the results
		if (!string.Equals(fields, "all", StringComparison.OrdinalIgnoreCase))
		{
			var shapedResults = results.Select(x => GetShapedObject(x, fields));
			return Ok(shapedResults);
		}
		return Ok(results);
	}
	catch (Exception)
	{
		return InternalServerError();
	}
}

public object GetShapedObject<TParameter>(TParameter entity, string fields)
{
	if (string.IsNullOrEmpty(fields))
		return entity;
	Regex regex = new Regex(@"[^,()]+(\([^()]*\))?");
	var requestedFields = regex.Matches(fields).Cast<Match>().Select(m => m.Value).Distinct();
	ExpandoObject expando = new ExpandoObject();

	foreach (var field in requestedFields)
	{
		if (field.Contains("("))
		{
			var navField = field.Substring(0, field.IndexOf('('));

			IList navFieldValue = entity.GetType()
										?.GetProperty(navField, BindingFlags.IgnoreCase | BindingFlags.Instance | BindingFlags.Public)
										?.GetValue(entity, null) as IList;
			var regexMatch = Regex.Matches(field, @"\((.+?)\)");
			if (regexMatch?.Count > 0)
			{
				var propertiesString = regexMatch[0].Value?.Replace("(", string.Empty).Replace(")", string.Empty);
				if (!string.IsNullOrEmpty(propertiesString))
				{
					string[] navigationObjectProperties = propertiesString.Split(new[] { ',' }, StringSplitOptions.RemoveEmptyEntries);

					List<object> list = new List<object>();
					foreach (var item in navFieldValue)
					{
						list.Add(GetShapedObject(item, navigationObjectProperties));
					}

					((IDictionary<string, object>)expando).Add(navField, list);
				}
			}
		}
		else
		{
			var value = entity.GetType()
							  ?.GetProperty(field, BindingFlags.IgnoreCase | BindingFlags.Instance | BindingFlags.Public)
							  ?.GetValue(entity, null);
			((IDictionary<string, object>)expando).Add(field, value);
		}
	}

	return expando;
}

///
<summary>
/// Creates an object with only the requested properties by the client
/// </summary>

/// <typeparam name="TParameter">Type of the result</typeparam>
/// <param name="entity">Original entity to get requested properties from</param>
/// <param name="fields">List of properties requested from the entity</param>
/// <returns>Dynamic object as result</returns>
private object GetShapedObject<TParameter>(TParameter entity, IEnumerable<string> fields)
{
	ExpandoObject expando = new ExpandoObject();
	foreach (var field in fields)
	{
		var value = entity.GetType()
						  ?.GetProperty(field, BindingFlags.IgnoreCase | BindingFlags.Public | BindingFlags.Instance)
						  ?.GetValue(entity, null);
		((IDictionary<string, object>)expando).Add(field, value);
	}
	return expando;
}

So, this allows the user to pass in the query string, a comma separated list of strings that specifies the names of the fields that he wants to be returned such as:

http://localhost:2365/api/trips?fields=name,stops(name,latitude,longitude)

and that would just contain the requested fields (thanks to ExpandoObject class) that helps us construct the object and return the results back to the client as below:

{
	"totalCount": 2,
	"resultCount": 2,
	"results": [
		{
			"name": "Trip to Scandanavia",
			"stops": [
				{
					"name": "Denmark",
					"latitude": 73.2323,
					"longitude": 43.2323
				}
			]
		},
		{
			"name": "Trip to Europe",
			"stops": [
				{
					"name": "Germany",
					"latitude": 72.37657,
					"longitude": 42.37673
				},
				{
					"name": "France",
					"latitude": 72.22323,
					"longitude": 42.3434
				}
			]
		}
	]
}

And that’s all. You can of course build on this approach and add support for multiple nested navigation fields support. Happy coding!

COM Interop without referencing COM assemblies using Dynamic C#


Dynamics is a very strong yet quite under utilised feature of C# which came with C# version 4.0. The primary premise for its usage is that the “object type or data structure is not known at compile time”. In these cases the using the dynamic keyword basically tells the C# compiler to defer it evaluating the object type/ data structure to run time instead of compile time. This functionality or capability comes from another language runtime that sits on top of the CLR (Common Language Runtime) called the DLR (Dynamic Language Runtime).

Dynamics has a lot of use cases in the .Net Framework, one of which is interacting with COM components without having to actually add references to the Primary COM Interop assemblies. Below I just wanted to show a little use case where we can use dynamic to create an Excel document without referencing the following Excel Interop assembly:

  • Microsoft.Office.Interop.Excel

Now ofcourse, you would have to have Excel installed on the system where the code would run, but we will eliminate the need to reference the COM interop assemblies to our project. Also with use of dynamics one would need to have knowledge of the library since we do not get any intellisense support in Visual Studio once an object is declared as dynamic. This is solely because of the fact that the compiler does not know the type of the object until its evaluated at run time. So you would only see the base object methods on the intellisense.

My intent here is not to create a fully featured application, rather to just show the use case of how we can use dynamics to interact with COM Interop assemblies without actually having to reference them in our projects.

I am going to create a simple Console application that will launch an Excel, open a worksheet and add some information to the rows and columns. The sample code for the simple application is available on github.

I am going to create a simple Person class, the data for which we will add to Excel.

public class Person
{
public string Name { get; set; }
public int Age { get; set; }

public Person(string name, int age)
{
Name = name;
Age = age;
}
}

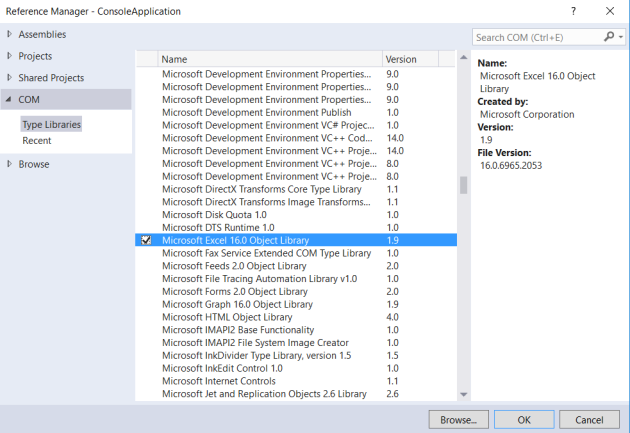
Create a Console application and add a reference to the following assembly

AddReferenceInteropExcel

This example opens Excel WITH the primary interop assembly reference

class Program
{
static List<Person> persons = new List<Person>();
static Program()
{
persons.Add(new Person("Frank", 25));
persons.Add(new Person("Joe", 24));
}

static void Main(string[] args)
{
var excelType = new Microsoft.Office.Interop.Excel.Application();
excelType.Visible = true;

excelType.Workbooks.Add();
Worksheet workSheet = excelType.ActiveSheet;

workSheet.Cells[1, 1] = "Names";
workSheet.Cells[1, 2] = "Age";

int rowIndex = 1;
foreach (var person in persons)
{
rowIndex++;
workSheet.Cells[rowIndex, 1] = person.Name;
workSheet.Cells[rowIndex, 2] = person.Age;
}
}
}

And the same example WITHOUT using the Excel interop assembly:


class Program
{
static List<Person> persons = new List<Person>();
static Program()
{
persons.Add(new Person("Frank", 25));
persons.Add(new Person("Joe", 24));
}

static void Main(string[] args)
{
dynamic excelType = Type.GetTypeFromProgID("Excel.Application");
var excelObj = Activator.CreateInstance(excelType);
excelObj.Visible = true;

excelObj.Workbooks.Add();
dynamic workSheet = excepObj.ActiveSheet;

workSheet.Cells[1, 1] = "Names";
workSheet.Cells[1, 2] = "Age";

int rowIndex = 1;
foreach (var person in persons)
{
rowIndex++;
workSheet.Cells[rowIndex, 1] = person.Name;
workSheet.Cells[rowIndex, 2] = person.Age;
}
}
}

We get the type of the Excel application using the Type.GetTypeFromProgID into a dynamic variable. Now we can program assuming that at Runtime the variable excelType will be evaluated to Excel.Application. As long as that happens during the run time our program will run just fine. However, its noteworthy that in case the type doesn’t evaluate to Excel.Application at runtime a RunTimeBinderException will be thrown when we try to access any properties or methods on the excelType variable.

So as we can see, Dynamic C# provides a very powerful mechanism that compliments the statically defined C# bindings and can also be used to interact with other dynamic langauages like Iron Python etc without much code clutter.

Integrating Rakuten API with Quartz.Net for Scheduling jobs using Windows Service


Recently one of my clients started using Rakuten E-commerce market place and wanted to develop a solution to run scheduled jobs at regular intervals for accessing the Rakuten API for tasks like updating stock information, fetching orders, updating shipment status for the orders etc.
The API is fairly well documented and is REST based, simple to understand. So I am going to show how we can work with Rakuten E-commerce market place API along side Quartz.Net for building Scheduled Jobs that will run inside a windows service.

Setup:
To start using Rakuten, You must request a license to use the Rakuten Marketplace Web Services Development Platform. Contact Rakuten Support to request your license. Rakuten assigns an authentication key to you containing your encoded credentials. This value must be used in each of your HTTP Request Headers to authorize your requests. Some of the other settings that we require to access the Rakuten API are:

I have used Visual Studio 2015 to develop this Windows Service.

Creating a HTTPClient with Authorization header to make API requests:
We will be using this HttpClient to make Rest based API requests to the Rakuten API

private HttpClient GetHttpClient()
{
    var client = new HttpClient();
    var authenticationKey = ConfigurationHelper.GetValue("AuthenticationKey");
    client.DefaultRequestHeaders.Authorization = new AuthenticationHeaderValue("ESA", authenticationKey);
    client.DefaultRequestHeaders.Accept.Add(new MediaTypeWithQualityHeaderValue("application/json"));
    return client;
}

Helper classed used:

namespace RakutenIntegrationService.Helpers
{
    public static class CronHelper
    {
        public static string GetCronExpression(double interval)
        {
            return string.Format("0 0/{0} * 1/1 * ? *", interval);
            //return "0 43 16 ? * *";
        }
    }
}

using System;
using System.Configuration;

namespace RakutenIntegrationService.Helpers
{
    public static class ConfigurationHelper
    {
        public static TResult GetValue<TResult>(string key)
        {
            var setting = ConfigurationManager.AppSettings[key];
            if (string.IsNullOrEmpty(setting))
                return default(TResult);
            var result = Convert.ChangeType(setting, typeof(TResult));
            return (TResult)result;
        }
    }
}

And then define a RestService class that contains methods to make GET and POST requests using this HttpClient

using System;
using System.Net;
using System.Net.Http;
using System.Net.Http.Headers;
using System.Text;
using Common.Logging;
using Newtonsoft.Json;
using Newtonsoft.Json.Serialization;
using RakutenIntegrationService.Helpers;

namespace RakutenIntegrationService.Services
{
    public class RestService : IRestService
    {
        #region Fields

        private ILog Log = LogManager.GetLogger<RestService>();

        #endregion

        #region IRestService members

        public TResult Get<TResult>(string uriString) where TResult: class
        {
            var uri = new Uri(uriString);
            using (var client = GetHttpClient())
            {
                HttpResponseMessage response = client.GetAsync(uri).Result;
                if (response.StatusCode != HttpStatusCode.OK)
                {
                    Log.Error(response.ReasonPhrase);
                    return default(TResult);
                }
                var json = response.Content.ReadAsStringAsync().Result;
                return JsonConvert.DeserializeObject<TResult>(json, new JsonSerializerSettings { ContractResolver = new CamelCasePropertyNamesContractResolver() });
            }
        }

        public TResult Post<TResult, TInput>(string uriString, TInput payload = null) where TInput : class
        {
            var uri = new Uri(uriString);
            using (var client = GetHttpClient())
            {
                var jsonContent = JsonConvert.SerializeObject(payload, Formatting.Indented, new JsonSerializerSettings { ContractResolver = new CamelCasePropertyNamesContractResolver()});
                HttpResponseMessage response = client.PostAsync(uri, new StringContent(jsonContent, Encoding.UTF8, "application/json")).Result;
                if (response.StatusCode != HttpStatusCode.OK)
                {
                    Log.Error(response.ReasonPhrase);
                    return default(TResult);
                }
                var json = response.Content.ReadAsStringAsync().Result;
                return JsonConvert.DeserializeObject<TResult>(json);
            }
        } 

        #endregion
    }
}

Configuring Quartz.Net to create Scheduled jobs for API operations
So I installed Quartz.Net using nuget package manager: https://www.nuget.org/packages/Quartz/. Afterwards I created a class called TaskScheduler that basically configures the Scheduled Jobs creation and is responsible for Running/ Stopping the Quartz scheduler

using Quartz;
using RakutenIntegrationService.Helpers;
using RakutenIntegrationService.Jobs;

namespace RakutenIntegrationService.Scheduler
{
    public class TaskScheduler : ITaskScheduler
    {
        #region Private fields

        private readonly IScheduler _scheduler;

        #endregion

        #region Constructors

        public TaskScheduler(IScheduler scheduler)
        {
            _scheduler = scheduler;
        }

        #endregion

        #region ITaskScheduler members

        public string Name
        {
            get { return this.GetType().Name; }
        }

        public void Run()
        {
            ScheduleGetOrdersJob();
            ScheduleStockUpdateJob();
            ScheduleShipmentUpdateJob();

            _scheduler.Start();
        }

        public void Stop()
        {
            if (_scheduler != null) _scheduler.Shutdown(true);
        }

        #endregion

        #region Private methods

        private void ScheduleGetOrdersJob()
        {
            var jobDetails = JobBuilder.Create<GetOrdersJob>()
                                       .WithIdentity("GetOrdersJob")
                                       .Build();
            var trigger = TriggerBuilder.Create()
                                        .StartNow()
                                        .WithCronSchedule(CronHelper.GetCronExpression(ConfigurationHelper.GetValue<double>("GetOrdersInterval")))
                                        .Build();
            _scheduler.ScheduleJob(jobDetails, trigger);
        }

        private void ScheduleStockUpdateJob()
        {
            var jobDetails = JobBuilder.Create<StockUpdateJob>()
                                       .WithIdentity("StockUpdateJob")
                                       .Build();
            var trigger = TriggerBuilder.Create()
                                        .StartNow()
                                        .WithCronSchedule(CronHelper.GetCronExpression(ConfigurationHelper.GetValue<double>("StockUpdateInterval")))
                                        .Build();
            _scheduler.ScheduleJob(jobDetails, trigger);
        }

        private void ScheduleShipmentUpdateJob()
        {
            var jobDetails = JobBuilder.Create<ShipmentUpdateJob>()
                                       .WithIdentity("ShipmentUpdateJob")
                                       .Build();
            var trigger = TriggerBuilder.Create()
                                        .StartNow()
                                        .WithCronSchedule(CronHelper.GetCronExpression(ConfigurationHelper.GetValue<double>("ShipmentUpdateInterval")))
                                        .Build();
            _scheduler.ScheduleJob(jobDetails, trigger);
        }

        #endregion
    }
}

The jobs classes can then be created to do concrete specific work. I am giving an example of the GetOrdersJob

using System.Linq;
using Quartz;
using RakutenIntegrationService.Helpers;
using RakutenIntegrationService.Models.Response;
using RakutenIntegrationService.Services;

namespace RakutenIntegrationService.Jobs
{
    public class GetOrdersJob : IJob
    {
        #region Fields

        private readonly IRestService _restService;

        #endregion

        #region Constructors

        public GetOrdersJob(IRestService restService)
        {
            _restService = restService;
        }

        #endregion

        #region IJob members

        public void Execute(IJobExecutionContext context)
        {
            var uri = string.Concat(DataServiceConstants.BaseEndpointAddress, "order/list", RequestBuilder.ConstructListOrdersRequestParams());
            var response = _restService.Get<OrderResponse>(uri);
            if (response != null && response.Orders != null && response.Orders.Any())
            {
                var ordersToProcess = response.GetOrdersToProcess();
                if (ordersToProcess != null && ordersToProcess.Any())
                    OrderProcessor.ProcessOrders(ordersToProcess);
            }
        }

        #endregion
    }
}

And then define a Windows Service class that provides methods to Start and Stop the Scheduler

using System.ServiceProcess;
using Common.Logging;
using RakutenIntegrationService.Scheduler;

namespace RakutenIntegrationService
{
    public partial class RakutenService : ServiceBase
    {
        #region Fields

        private static ILog Log = LogManager.GetLogger<RakutenService>();
        private readonly ITaskScheduler _taskScheduler;

        #endregion

        public RakutenService(ITaskScheduler taskScheduler)
        {
            InitializeComponent();
            _taskScheduler = taskScheduler;
        }

        protected override void OnStart(string[] args)
        {
            Log.Info("Starting Rakuten Scheduler service.");
            _taskScheduler.Run();
        }

        protected override void OnStop()
        {
            Log.Info("Stopping Rakuten Scheduler service.");
            _taskScheduler.Stop();
        }
    }
}

And that’s pretty much about it. You can add as much custom functionality in the individual jobs classes depending what work you want the Scheduled Job to perform.

Windows Universal Apps: “The page name does not have an associated type in namespace, Parameter name: pageToken”


When building Universal Windows Apps, and using Prism to compose the application, you would have changed your App.xaml.cs class to something like this:

public sealed partial class App : MvvmAppBase
    {
        #region Private fields

        private readonly IUnityContainer container;

        #endregion

        #region Constructors

        public App()
        {
            this.InitializeComponent();
            container = new UnityContainer();
        }

        #endregion

        #region Overrides of MvvmAppBase class

        protected override Task OnLaunchApplicationAsync(LaunchActivatedEventArgs args)
        {
            NavigationService.Navigate("Main", null);
            return Task.FromResult<object>(null);
        }

        #endregion

        #region Unity Container methods

        protected override Task OnInitializeAsync(IActivatedEventArgs args)
        {
            container.RegisterInstance<INavigationService>(NavigationService);
            ViewModelLocationProvider.SetDefaultViewModelFactory((viewModelType) => container.Resolve(viewModelType));
            return base.OnInitializeAsync(args);
        }

        #endregion
    }

But when you try to run your application you would get the error The page name does not have an associated type in namespace, Parameter name: pageToken

The reason is simple :). Your MainPage (and all views for that matter) needs to be inside the Views folder inside your project and not in the root. This applies to both Windows and Windows Phone app projects.